Thursday, May 28, 2009

OBIEE Write Back

We were trying to implement an update of multiple columns in a single update.

A few things to remember:
1. The XML is case sensitive. (If you use a 'C' instead of a 'c' your XML will not work correctly.
2. Each column that has write back enabled, should have a corresponding SQL entry in the XML template.
3. If there is a text entry being written back dont forget to put quotes around the dynamic column name.
4. Everytime you change columns in the report, the columns numbers change so make sure the XML template and the column names match.
5. The XML template should be saved in : D:\OracleBI\web\msgdb\customMessages
Its name can be anything.xml
6. the template name is: , this will be the same name used when specifying write back features.
7. A great source for creating the write back functionality in OBIEE is Venkat's post at: http://oraclebizint.wordpress.com/2007/09/20/oracle-bi-ee-101332-write-back-option-budgetingplanning/
8. For an example of the XML used for update please see the next post.

Anisha

Tuesday, May 19, 2009

Updating Oracle BI Apps 7.9.5.1 to 7.6

This is a compilation of information based on our current installation and based on the update and installation guide leading to a successful upgrade to 7.9.6. from 7.9.5.1.

Our source and target databases are Oracle.

This is just a synopsis of the steps we followed.

For a more detailed explanation you can visit OTN and download the relevant documentation.


1. You want to backup all existing information.

- DAC repository (thru DAC export option)

- DAC install folder

- BI Apps RPD

- BI Apps Catalogue

- Informatica repository


Remember all installation directories should be in locations which do not have a space in the location. eg: DO NOT install informatica or java in C:\Program Files. This will cause problems for DAC (which is needed to run the informatica mappings).


2. Uninstall the existing BI Applications and then restart your machine

3. Unset all informatica variables

4. Install BI apps 7.9.6

5. Install Informatica 8.6 + HotFix 4 - create integration and repository services if they do not exist. update Informatica repository

6. Install DAC - update DAC repository

7. Set parameters in DAC and Informatica to connect to databases


8. Check the pmrep and pmcmd connections

9. Build an execution plan with a single subject area (uncheck all options) to test that all connections are in place and then proceed to build with additional subject areas.


Wednesday, May 13, 2009

Hiding elements from an adhoc user in OBIEE

Once we created reports, we presented them to users and we were asked to make some changes.

Some of the things pointed out were:
1. In the adhoc analysis some of the element names were not as intuitive to all business users so we needed to change some names.
2. Exposing the time dimension needed a lot more training. Users pulled in the time dimension with elements from unrelated facts and dimensions.When they tried to view the results of their analysis some element values would disappear or they would be presented with an error message.
3. We needed to use a few more elements to enable some additional functionality in the reports. These were meaningless to adhoc users.Unless they were trained to use them they would not work correctly or be useful.Plus most of the business users had no need to use these functionality elements. It just added a lot of clutter.

Some possible solutions for the points above and fall backs:
(None of these are wrong but none of these worked completely in our case)
1. We could change the names of all the elements and then we would have had to go back to each report and modify each element.(We could not find a simple way to ensure all reports would sustain the name changes without creating aliases)
2. We could have pulled in time dimension elements correctly for each of the Facts and Dimensions and named them appropriately, so that users would only use those elements. - This again would have required changes in the reports as we could not find away to create aliases when the folder name changed.
3.We could have created a folder which would be titled - 'For Development' and then make sure the users were told not to use the folder. - Curiosity would have got the better of us as the folder was still exposed and accessible to the users.

Our Solution
Before I go into that I guess I should mention that we are using LDAP authentication & authorization.
For this we had to create our own groups on the database. Groups and privileges were not downloaded from the LDAP server itself. If this would have worked we could have attempted to hide elements from a select user group and yet display them to other groups.

As we already had preexisting reports, we created a second subject area which would be used for adhoc analysis by the business users. This way all name changes and rearranging of elements could be achieved without breaking the reports in the subject area exposed to the users.
The subject areas now looked completely different even though they were fed by the same logical model.
As an administrator we could block access to the Administrative subject area from all non advanced users.This way when the users log in they could see only one of the subject areas with the more intuitive names and no technical elements. Only advanced users, who would need to create reports, would be trained on the Administrative subject area as ahdoc users would not need to see the technical elements.
Tuesday, May 12, 2009

Creating a navigation/drill thru report

In my last post I talked about using the navigation capability in the reporting layer to create the illusion of Drilling down.

This is easily achieved by creating a report with all the elements you wish to see. (Kind of like a detailed view)
We were using "Loan ID" to click thru to this report.
To allow a user to prompt on "Loan ID", so that only the data relevant to that "Loan ID" is displayed, the "Loan ID" needs to be prompted.
This can be easily done in the filters section by setting the option to 'is prompted'
Now whenever a user click on a "Loan ID", the report will navigate to this detailed report and present the user with more detailed information about that "Loan ID"

So far we have gone through many iterations in our report development.
One of the changes made was that "Loan id" was renamed to "Loan ID". The fact that the case of the attribute name was different did not cause any of the pre-existing reports to fail. But it did not work when navigating using prompts. "Loan id", was not able to prompt "Loan ID".
If you are going through many changes and could miss something, my suggestion would be to always check the names & spelling of the attributes or they will not work as you imagine they should.

OBIEE Drill through/Drill down

Our users asked to be able to drill down from an element to other elements.

In this case -
They wanted to click on "Loan ID" and see some additional elements for that "Loan ID".

Our two options were to either create a hierarcy in the 'Administrator' tool or to create a navigation path between two reports.


We chose the second option - to enable Drill thru as a navigation option between the reports.
This was useful as the information available after the Drill was easier to customize. An advanced user could be trained to add or remove elements at this level.


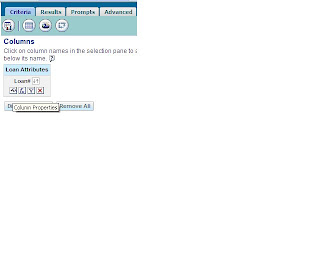
To achieve this, go to the Criteria tab of the report and click on the Column properties


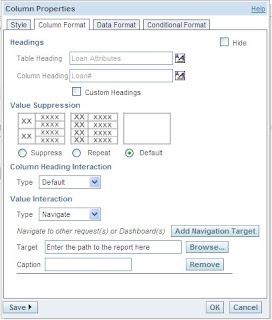
Select the tab for column Format and under value integration, set it to Navigate.
You will then see the options to add navigation target (You can add more than one target but make sure you enter a unique caption for each target).
For the first target, enter the path to the report you wish to navigate to ( I have assumed you have already created your detailed report and that "Loan ID" is set to prompted(next post).Enter a meaningful caption.

If you wish to add more targets, click on 'Add Navigation Target' and you follow the same instructions above.
Click OK once you are done and want these changes to be applied only to the current report.
If you want the changes to be applied to all the reports which would use this element, click on Save in the bottom left corner, and select "as system wide default for "Loan Attributes"."Loan ID".
You can always go to other reports and turn this option off by setting the value interaction to - 'No Interaction'

Once done save this report and preview it.
You will see that when you hover over a Loan ID, the mouse pointer will turn into a hand and be clickable like a hyperlink.
If you have more than one navigation target, you will be given all the options as a sort of drop down menu when you click the Loan ID.

OBIEE Tips

This blog contains some of the different issues I have run into during my implementations of OBIEE and OBIApps.
Feel free to leave your comments and/or tips.

Thanks,
Anisha